In this article we’re going to set up an Angular 20 web application with server-side rendering, using AWS Lambda and Cloudfront to serve it, and AWS CDK v2 to manage the infrastructure.
If you’re reading this, I’m assuming that you know how CDK and Angular work. I’m not going to explain in detail how to set up your projects.
The CDK Construct
Create a CDK application wherever you want. I usually create a folder within my Angular project, called aws or infrastructure.
Now create a new file in the lib folder called angular-ssr.ts (or whatever you want) and put this code in it.
import {CfnOutput} from 'aws-cdk-lib';
import {Code, Function, FunctionUrl, FunctionUrlAuthType, HttpMethod, Runtime} from 'aws-cdk-lib/aws-lambda';
import {Construct} from 'constructs';
import {Certificate} from 'aws-cdk-lib/aws-certificatemanager';
import {
  CachePolicy,
  Distribution,
  OriginRequestPolicy,
  PriceClass,
  ViewerProtocolPolicy
} from 'aws-cdk-lib/aws-cloudfront';
import {FunctionUrlOrigin} from 'aws-cdk-lib/aws-cloudfront-origins';

export interface AngularSSRProps {
  /**
   * Used to comment the Cloudfront distribution
   */
  appName?: string;
  /**
   * If set, the Cloudfront distribution will have custom domains and an SSL certificate.
   * The certificate domains must cover the domains specified in `domainNames`.
   */
  certificate?: Certificate;
  /**
   * If set, the Cloudfront distribution will have custom domains.
   * For this to work, you must specify a `certificate` as well.
   */
  domainNames?: string[];
}

export class AngularSSR extends Construct {

  public distribution: Distribution;
  public lambdaUrl: FunctionUrl;
  public ssrLambda: Function;

  constructor(scope: Construct, id: string, props: AngularSSRProps) {
    super(scope, id);

    this.ssrLambda = new Function(this, 'WebsiteSSRLambda', {
      // Adjust this if it's outdated
      runtime: Runtime.NODEJS_22_X,
      handler: 'index.handler',
      // We'll create this file later, change path if needed
      code: Code.fromAsset(`./assets/ssr-lambda`),
      // Adjust to your project needs
      memorySize: 1024
    });

    this.lambdaUrl = this.ssrLambda.addFunctionUrl({
      authType: FunctionUrlAuthType.NONE,
      cors: {
        allowedOrigins: [
          'https://localhost:4200',
          ...(props.domainNames?.map(d => `https://${d}`) ?? []),
        ],
        allowedMethods: [HttpMethod.GET],
        allowCredentials: true,
        allowedHeaders: ["*"]
      }
    });

    this.distribution = new Distribution(this, 'WebsiteSSRDistribution', {
      certificate: props.certificate,
      domainNames: props.domainNames,
      defaultBehavior: {
        origin: new FunctionUrlOrigin(this.lambdaUrl),
        viewerProtocolPolicy: ViewerProtocolPolicy.REDIRECT_TO_HTTPS,
        originRequestPolicy: OriginRequestPolicy.ALL_VIEWER_EXCEPT_HOST_HEADER,
        cachePolicy: CachePolicy.CACHING_OPTIMIZED
      },
      priceClass: PriceClass.PRICE_CLASS_ALL,
      comment: props.appName,
      errorResponses: [
        {httpStatus: 403, responseHttpStatus: 200, responsePagePath: '/index.html'},
        {httpStatus: 404, responseHttpStatus: 200, responsePagePath: '/index.html'}
      ]
    });

    new CfnOutput(this, 'ClientLambdaURL', {value: this.lambdaUrl.url});
    new CfnOutput(this, 'DistributionID', {value: this.distribution.distributionId});
  }

}Some remarks on this code
- Line 51: I’ve included
https://localhost:4200in theallowedOriginsproperty. This is only useful for debug purposes if you also plan to include additional API endpoints in your lambda, but it won’t be covered here. - Line 52: This line maps the domains array we’ll be using later, and adds “
https://” to each of them, so that they can be used by CORS headers. If you also need old fashioned “http://“, you don’t.
The CDK Stack
Now that we have our construct, let’s use it. Open your main stack file in your lib folder and write the following code:
import {Construct} from 'constructs';
import {CfnOutput, Stack, StackProps} from 'aws-cdk-lib';
import {AngularSSR} from './angular-ssr';
import {ARecord, HostedZone, RecordTarget} from 'aws-cdk-lib/aws-route53';
import {Certificate, CertificateValidation} from 'aws-cdk-lib/aws-certificatemanager';
import {CloudFrontTarget} from 'aws-cdk-lib/aws-route53-targets';

export class SSRStack extends Stack {
  constructor(scope: Construct, id: string, props?: StackProps) {
    super(scope, id, props);

    // You should probably move these variables to a better place if you're setting up a big project
    const baseDomain = 'example.com';
    const domainNames = [`${baseDomain}`, `www.${baseDomain}`];
    const appName = `My SSR Angular App`;

    // This is required if you want to generate a certificate and/or add DNS records.
    // You must create the hosted zone BEFORE deploying this stack.
    const hostedZone = HostedZone.fromLookup(this, 'HostedZone', {
      domainName: baseDomain
    });

    // You can comment out / remove these two Certificate items if you don't need a certificate.
    const certificateStack = new Stack(this, 'CertificateStack', {
      env: {
        // Provide the AWS account number however you prefer. In this case, I'm using the stack props that you can set in your CDK entry point (bin folder).
        account: props?.env?.account,
        // DO NOT TOUCH: region MUST be us-east-1 for Cloudfront certificates.
        region: 'us-east-1'
      },
      // This is required if you're going to deploy your stack in a region that is not us-east-1
      crossRegionReferences: true,
    });
    const certificate = new Certificate(certificateStack, `WebsiteSSRCertificate`, {
      domainName: domainNames[0],
      subjectAlternativeNames: domainNames.slice(1),
      validation: CertificateValidation.fromDns(hostedZone)
    });

    const angularApp = new AngularSSR(this, 'Client', {
      appName,
      certificate,
      domainNames
    })

    // Remove this part if you don't need to create DNS records.
    for (const domain of domainNames) {
      const websiteDomainRecord = new ARecord(this, `WebsiteDnsRecord`, {
        recordName: domain,
        target: RecordTarget.fromAlias(new CloudFrontTarget(angularApp.distribution)),
        zone: hostedZone
      });
      new CfnOutput(this, 'WebsiteURL', {value: websiteDomainRecord.domainName});
    }

  }
}
If you are deploying your stack in a region that is NOT
us-east-1, and you’re planning to use certificates, you’ll have to addcrossRegionReferencesto your stack properties (the main CDK entry point, the file in thebinfolder), just like we did in the code above for the Certificate Stack.
The Lambda Code
I’ve found myself fiddling a bit to make SSR rendering with Lambda work with Angular, and I’m not completely satisfied with the solution I’ve come up with, but I’ll keep this updated should I find a better implementation.
In your CDK project root folder, create a new folder. I called it assets in this case. In this folder, create another folder called ssr-lambda, and: initialize npm.
- In your CDK project root folder, create a new folder. I called it
assetsin this case - In the
assetsfolder, create another folder calledssr-lambda - In the
ssr-lambdafolder, install theserverless-expresspackage
npm install @codegenie/serverless-express- Create a file called
index.jsand paste this code
const serverlessExpress = require('@codegenie/serverless-express')
let serverlessExpressInstance

async function setup (event, context) {

    const server = await import('./server/server.mjs');
    serverlessExpressInstance = serverlessExpress({ app: server.reqHandler })
    return serverlessExpressInstance(event, context)
}

function handler (event, context) {
    if (serverlessExpressInstance) return serverlessExpressInstance(event, context)
    return setup(event, context)
}
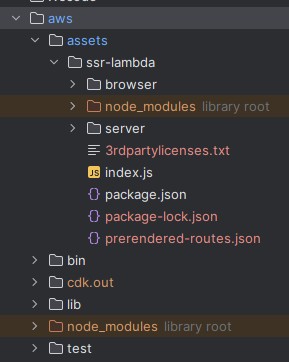
exports.handler = handlerNow build your Angular application, and copy the output folders and files (by default within your dist/projectName folder of your Angular project) in the ssr-lambda folder.
You should end up with something like this.
Deploying
In your CDK project folder, you can now run
cdk deploy --allYou have to use --all if you’re using the Certificate Stack, so that all stacks are deployed with your command.
Basic Automation
Now that we have a running SSR Angular application on AWS Lambda and Cloudfront, I’m going to give you some VERY BASIC automation scripts that might speed up your development and testing.
Automatically copy build output to lambda folder
Doing this is surprisingly not easy and requires a few steps:
- OPTIONAL: I usually remove the project name from
outputPathin thebuildoptions of myangular.json, so that I can keep scripts generic. If you don’t, you’ll have to adjust the following scripts. - In you
package.json, add apostbuildscript.
Windows:
"scripts": {
    "ng": "ng",
    "start": "ng serve",
    "build": "ng build",
    ...
    "postbuild": "robocopy .\\dist .\\aws\\assets\\ssr-lambda /E"
}Linux (untested, you might want to do a dry run first):
"scripts": {
    "ng": "ng",
    "start": "ng serve",
    "build": "ng build",
    ...
    "postbuild": "rsync -a --delete ./dist/browser ./aws/assets/ssr-lambda/browser && rsync -a --delete ./dist/server ./aws/assets/ssr-lambda/server"
  }

If you have a better solution, let me know!Now that you have your
postbuildscript, you’ll be super happy to know that it doesn’t run if you build usingng build.It only works if you run
npm run build, because yes.
Build, deploy and invalidate cache
If you want a quick and dirty script that builds the Angular application, deploys the CDK project with your updated code, and invalidates Cloudfront’s cache, here you go:
npm run build

Platform-specifically go into your CDK project directory (e.g. cd ./aws)

cdk deploy --all
aws cloudfront create-invalidation --distribution-id YOUR_DISTRIBUTION_ID --paths "/*"
Remember to handle AWS and CDK CLI authentication the way you’re accustomed to (e.g. add --profile if you’re using profiles)
Conclusion
In this article we’ve set up a quick and dirty AWS CDK project to serve a server-side rendered Angular application using AWS Lambda and Cloudfront.
We also added code to automatically generate certificates and DNS entries for custom domains.
If you spot any mistakes or have found a better implementation, make sure to write a comment!
See you next time, cheers!